
The most requested “how-to” I receive in my inbox is on frosting cupcakes! With cupcakeries popping up everywhere with adorable little frosted treats – few can resist wanting to eat a million a few. But with the economy in a slump very few can afford to buy 40,000 custom cakes for the church open house. So for all of us overachievers out there (do you like how I threw myself in there with you?), I am going to do several posts on cupcake frosting techniques. Throughout the rest of the year I will be sporadically showing you frosting ideas that will awe, amaze, and save. And hold on to your piping bags ladies – here is the best part – you have my full permission to eat all your cupcakes after we are done. So let’s get started. The first method is very simple. I call it the “Ice Cream Swirl.” And I’ll show you how to do it with two different frosting tips for two different looks.

The first step to decorating cupcakes beautifully is to start with a beautiful cupcake. Instead of eyeballing your batter, measure it before pouring it into the liners. 1/4 cup should do it for standard sized cupcakes. This will ensure that all your cupcakes are the same size making it much easier to uniform frost. Other tips: If you don’t have time to make your cupcakes from scratch and have opted for a boxed cake mix – You can add one large 1.5 ounce instant vanilla pudding dry packet to the cake mixture for extra moistness. You can also substitute water with milk for extra moist cupcakes.

Once you have your cupcakes made, it’s time to start your frosting! Use your favorite recipe. The one you grew up with usually tastes best! (You can find my favorite buttercream recipe in a post soon to come.) I always suggest doubling your frosting recipe for plenty of “poison testing.” No matter what recipe used, the end result has to be great consistency. When you have beautiful stiff peaks, you know that your frosting is ready! Once you feel your frosting is the correct consistency, beat it on the lowest setting for a few extra minutes. This will release any air bubbles and will make your frosting extra smooth. Note: You can always add extra liquid to soften the buttercream or extra confectioners’ sugar to stiffen it.
Now it’s time to pull out your decorating tools or weapons like I prefer to call them. I use the extra large 20″ canvas frosting bags. They are much easier to work with than the plastic ones for me. You will also need an extra large coupler and tips. Below are the two tips I used for these two techniques.
Place the frosting in your bag by folding your assembled decorating bag in a tall cylinder container. Once your bag is filled, you can either roll the end of the frosting bag nicely like a real pro – or you can tie it tight with an elastic like me! For me this is just easier and I push the frosting down as I go.

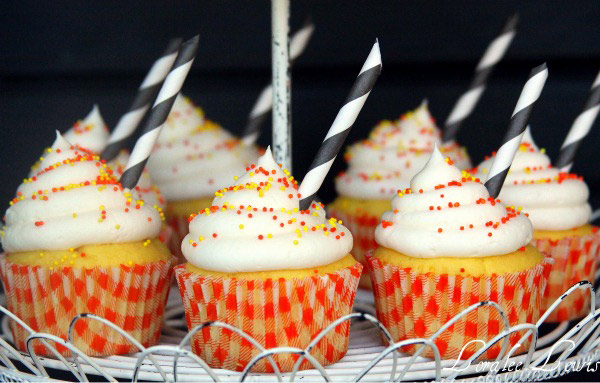
Wilton Tip 826 (aka a large closed star), will make the cupcakes shown in the first photo above. Wilton Tip 806 (aka a large plain circle), will make the cupcakes shown directly above.
 How to hold your piping bag: You can either grip your bag from behind the bag or in front. See photo for visual. It really doesn’t matter in my opinion. Just do what is most comfortable.
Now it’s time to fake/prove you are legit. Hold your piping tip approximately 1/4″ above your cupcake at a 90° angle. Start on the inside of your cupcake – not on the very edge. Now begin pretending you have your dream job as a soft-served ice cream maker at McDonald’s. Don’t worry; somehow you look great in the uniform. Focus. Using a circular motion, pipe the frosting around your cupcake lifting up ever so slightly by raising your wrist as you go around each layer. Work inward and upward. When you get to the top, stop pressure. Pull your tip straight up and away. Now stare at your perfect cupcake. 
You no longer care about your uniform. You know you are fabulous. Look at your cupcake!
Now let’s do it again with the other tip.
Perfection. Repeat with the rest of your cupcakes.
There is nothing wrong with adding a little bling at this point. If you are planning on utilizing sprinkles, use them quickly. If you let the frosting dry, they won’t stay on very well. For the below cupcakes, I added some striped straws cut in half on an angle and the rosette cupcake toppers from my Classic Children’s Costume Collection created for the Babiekins Magazine photo spread (out next month)! Yipee!! Don’t worry, I will show you way too many photos when it comes out.

More frosting how-tos to come in the near future!
Blog to you soon,


Leave a Comment